Saturday I went to Canadian Tire, and came home with the following items for my wheel:
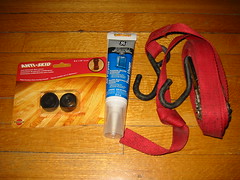
Yes, you see non-skid feet, silicone caulk, and a tie-down, and yes, all three items are for my wheel. (The tie-down was scrounged from my dad.)
It's pretty obvious what the non-skid feet are for. (Looking at the bottom of the wheel, it used to have four non-skid feet, but three were missing. No wonder it tended to slide around.) Sliding problem now solved! I stuck them on with sticky pads for now, but I'll drill holes and screw them in properly later. No point in losing more feet. I just wanted to test them before I did anything as permanent as drilling holes, as I'm sure you can understand.
Now, the other two items are for constructing a new drive band.

Step 1: Cut a section of nylon webbing a bit longer than the original drive band. It needs overlap, and err on the side of too long rather than too short. (Making it shorter is easer than making it longer!)
Step 2: Melt the cut edges so they don't fray:
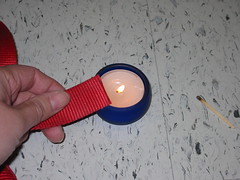
Tip: You can do this with pretty much any synthetic rope or ribbon, as far as I know. It works great. Just be sure to hold it to the side of the flame so that you don't end up with soot marks on your pretty ribbon. ;) (Soot marks on rope are less of a worry, but you might as well make things pretty if it's so easy.)
Step 3: Wash the grunge off the scavenged strap:
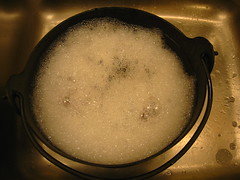
Keep changing the water and adding more dish detergent until the water stops turning brown. Resign yourself to whatever stains are left. (This step isn't necessary if you buy new nylon webbing rather than scavenging stuff from the back of your dad's truck.)
Step 4: Sew the band to the correct diameter. (I didn't take any photos of this step.)
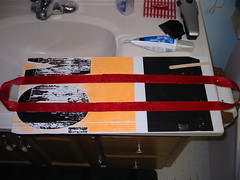
Step 5: Apply silicone caulk:

Pinning it to a flat surface makes things easier. Use a disposable popsicle stick or something to spread the caulk, rather than a finger. Do this in as well a ventilated space as possible while still being at the proper temperature, and try to not breathe in the fumes. Smooth the caulk and spread it evenly over the entire band on one side. Let the first bit dry before re-pinning to caulk the parts that are shown curved in the photo.
Step 6: The caulk should dry within 30 minutes, but will take another 24 hours to cure.

Try to be patient.
Step 7: Enjoy spinning!!!!
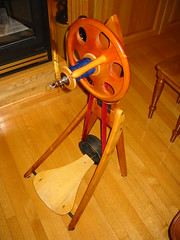
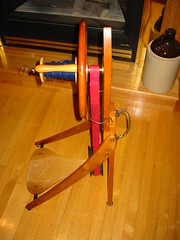
It works like a *dream*! Much better than the old drive band. (I wonder if it had aged enough that it lost it's non-slip coating? I also wiped down the two contact points too, so maybe that made a difference.) At any rate, it's much easier to spin now, and even somewhat quieter. I can actually start spinning by rotating the top wheel, and there's no slipping any more.
How much did I pay for my new drive band? Well, not counting anything for the labour and possibly toxic fumes breathed in, I think it was $3 for the caulk, and the webbing was free. I don't think the webbing would have cost more than a few dollars even if I had had to buy it, from what I remember the stuff in fabric stores costing. Not only do I have a great drive band (doesn't the red look snazzy with the wood?), but it didn't cost me $A80 plus shipping! :) (Although I'm sure the $A80 drive band is a lovely one too.)
Are you jealous? I got a *wonderful* wheel that only needed $7 in repairs (between the feet and the caulk). Should I shut up now, before I lose all my readers from jealousy? ;)
PS: Tonight I gave the first skein of handspun to the lady who got me this wheel, and she was very appreciative. :)
The story of this wheel:
The original owner was a professor at the University, I think in Economics, and her husband was a professor too. They took a sabbatical in Australia, and the woman had the wheel made for her. (It's dated 1980.) She belonged to the Crafts Council of Manitoba, as did the lady (J) who arranged for me to get the wheel. The original owner now has Alzheimer's, which is why she is no longer spinning. The wheel was given to J, but she was unable to ply on it. She gave it to F, to give to someone who wanted it. After talking to J, and telling her that I was saving up for a wheel, J called F to see if she still had it. F did, and now the wheel is mine. :) F had said that the woman had intended to give it to F, since F was the youngest of the group. I'm not sure why it went to J instead of F, but F wasn't using it, and couldn't get it to work properly anyway. She was happy for it to go to me, since she wasn't using it anyway, and the original owner had wanted it to be used. If I ever decide to stop using it, I am to pass it along to someone who will use it.
PPS: I didn't buy a fan belt because they were more expensive than I thought, and they looked like they'd be too stiff.
8 comments:
hooray! i knew you could construct a drive band for it. :) I like the look, too!
Wow, I'm thinking you should grab yourself a Knitting Scout MacGyver badge!
http://www.cast-on.com/?page_id=123
Done! Thanks Kath. ;)
Yay!
Glad you got the drive band issue sorted in a far more cost effective way...more money to spend on yarn and fibre now :-)
Okay - once again you amaze me with your ingenuity. Fantastic!
Where there's a will, there's a way. You go girl!
That is awesome -- I'm all for scrounging parts like that. I'm so impressed! :)
what a cute little wheel... awsome!!
Post a Comment