Saturday, February 16, 2008

Painting Workshop

Today I took a workshop on painting with water soluble oils. Wow... oils are *really* different from acrylics! I kept expecting them to act like acrylics, and they didn't. (They had both advantages and disadvantages.) I didn't like my painting at first, but it's growing on me as I get some "distance" from it:
My Workshop Painting
Sorry about the glare on these photos... the oils still aren't dry (of course... they're oils!), so I didn't want to move them to try to get a location with enough light that I could take photos without flash. (Assuming one existed... this *is* winter, and the sun does set early.)

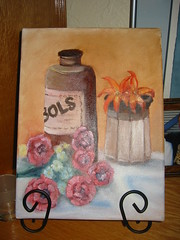
I didn't paint the tiger lilies. Or, more accurately, I painted them several times, ending up with crap each time. The instructor painted the ones seen here, and demonstrated how to "fix" one of my roses. The rest is all mine, although I did make some changes based on suggestions from the instructor. (Oh, yeah, he did tone down some of my whitish flowers, although I painted back over a few of them.)

For a comparison, here's my mom's painting:
Mom's Workshop Painting
Mom took a different approach to not being able to paint the tiger lilies.

We were at the same table, and so had pretty similar views of the still life. The arrangement of the still life looked a bit better from where the instructor was standing, but the lilies looked out of place no matter what. (Who puts lilies just poking out of a squat little jar like that?) Part of the problem is that the flowers were artificial and pretty crappy... probably not good quality to begin with, and ancient.

The bottle that says "BOLS" on it is some sort of bizarre wine bottle. I wish I had had the same idea that R had... she changed the label to something much nicer looking.

I haven't decided yet what I'll do with my painting. I forgot to sign it before cleaning my palette and brushes... but then I'm not sure I want to sign it with the lilies being done by the instructor. (Mom thinks I should paint over the lilies anyway, since they don't fit with the rest of the painting. I wonder if my oils, last used in 1989, are still good?)

Found on Flickr


Breakfast Picnic

What an amazing watercolour painting!

Friday, February 15, 2008

Funny!

Bethany linked to this, and I had to share. It's funny!!! (I wonder if disciplinary spray bottles would work in the middle east?)

Found on Flickr


Bloom Tree Pendant

Beautiful! I don't think I could create anything this amazing out of polymer clay.

Thursday, February 14, 2008

Found on Flickr


rooster

Awesome!

Funny

The other day I lost one of the clips that keeps my headphones on (I have the type that clips to each ear). Yesterday I simply didn't listen to podcasts on the bus because of it, today I borrowed one of the free ones my mom got when flying. The free headphones were *terrible*... the jack didn't want to stay in, so it kept switching to a single ear or no signal altogether, and even when I did have both ears working, I could barely hear the podcast over the surrounding noise. So, since I had a few minutes this morning, I headed over to the university bookstore to see what they had for headphones.

First funny thing: Maxell had two of the clip on types that were *identical* when it comes to the specifications on the back, the only difference was that one was labelled "deluxe", was orange, and cost $3 more. (Huh?)

Since the non-deluxe ear clips were only $5, I decided to buy a pair, even though there's still hope that I'll find the missing clip. Having a back-up pair isn't a bad thing. Hopefully they'll sound decent.

Second funny thing: While waiting in line, I was idly looking at the specifications on the back. They're given in English, French, and Spanish. (That's not the funny part.) The funny part? In English, the measurements are given in Imperial, but in French and Spanish they're given in metric. Even funnier? The French cord length is .92 m, and in Spanish it's 90 cm. Hee hee!

(Do I have a strange sense of humour?)

Wheel Case

I added the padding to the bottom of the wheel case (not photographed), and also created a sleeve to protect the places where wooden parts come in contact when the wheel is folded:
Padding Padding
I also went over to dad's, and he measured my bobbin and shaft... we're going to attempt making extra bobbins! :)

Book Sale


Creative Machine Stitching

The U of M libraries had it's book sale today. I bought two craft books and a paperback novel, for a grand total of $2.25. I like book sales. :)

Wednesday, February 13, 2008

Pita Bread Recipe

I just finished typing this up again, so I thought I'd share it here. Recipe as written:

Pita Bread (Arabic Bread)

1 pkg or cake yeast 1 tbsp sugar 6 c flour 2 tsp salt 2 c lukewarm water 1/3 c milk

Dissolve yeast and sugar in 1/2 cup warm water. Let stand 5 to 10 minutes. Place flour and salt in large bowl, making a depression in centre. Combine milk, remaining water and dissolved yeast. Pour into depression. Mix flour with liquid, making sure all batter on sides of bowl is mixed in. Knead until smooth and sides of bowl are clean (dip hands in water occasionally to give smooth elastic finish). Cover with towel and let rise in warm place until double in size, 2 to 4 hours. Take orange sized balls from edge of dough and form into smooth balls. Cover and let rise on cloth for 30 minutes. Roll into 1/4 inch thick circles. Cover and let rise on cloth for 30 minutes. Heat oven to 475F. Place dough directly on racks. When dough rises into mound, after 2 to 5 minutes, place under broiler for a few seconds until lightly browned; cool. Yields 7 to 9 loaves.

My notes: I use warmer than lukewarm water, but still a temperature you can comfortably put your hands in. I like to do the first rising in the oven with just the oven light on. (It provides enough heat to make a great rising temperature.) When baking, bake until most of the pitas blow up like balloons, but don’t wait for stubborn ones. Then switch to the broiler until it turns red. The pitas will be pretty pale (basically white), but oh-so-good!

Although it looks like a lot of work, most of the time is with the bread rising, which happens while you do other, more fun things, like knit. ;) Kids really enjoy watching the pitas balloon up, and then letting you know when the broiler is red. (I only use times when I’m sadly without a window in my oven.)

Fresh pitas from the oven with butter are heavenly. To keep the fresh taste, freeze once they’ve cooled, and thaw when you want them.

Enjoy!

Tuesday, February 12, 2008